At the beginning of last month, John and I were having a chat. He said that he was keen to have a small game to "get those figures on the table that I have been painting all these years" and to try out the second edition of Général d'Armée.
 |
| View of the table of battle that John sent to me a few days after our phone call. |
"Would I be interested sometime?"
"Sure! Shall we strike while the iron is hot," I said "and book in something sooner rather than later?"
When?
We decided on a mid-week game. His time is pretty flexible at the moment and, since my pre-retirement job is casual work, with a couple of weeks' notice, I could organised a couple of days off.
Done. Dates agreed. Time duly booked to have Wednesday & Thursday 15th & 16th of May off. To make the most of the time, I'd try to head down on the Tuesday night.
The appointed day arrived. I'd had an early start, plenty of driving and a reasonably long day, so dropped John a text when I left home to say that I should make it, but if I got tired, I'd pull over and carry on later.
It was not a drama!
I cranked up the vibes in the car and easily completed the 360 km, on a beautiful evening/night for driving.
In fact, so much so that when I got there, still being well and truly in my 'second wind' and John, naturally, keen to get going, we decided to set-up the game ready for the next morning.
This was doubly good, as it meant that I could familiarise myself with my commands and the set-up process in General d'Armée v2 is a bit involved. For this first game, John intended to play the rules in their entirety and completely 'as is'. Including things that he was not sure about himself.
I was well and truly stuffed when we pulled up stumps in the early hours of Wednesday, but we were ready to go next morning... I mean, in a few hours' time.
So much for the travelogue intro., what the hell happened?!
The game
As a small and simple game for his first play-test of the rules, John chose 'Eckmühl 1809', which is one of two scenarios provided in the rules. This was an obvious choice as the campaign of 1809 has been a particular focus of his, so he has a lot of French and Austrians painted—if this scenario had not been provided with the rules, he would have staged a game from this campaign anyway, likely using one of Michael Hopper's scenarios.
The scenario is a highly stylised version of the north of the main area of the battle, involving the attack by Friant's 2nd division of Davout's corps on Prince of Hohenlohe-Waldenburg-Bartenstein's division of Rosenberg's IV Corps north of Oberlaichling and Unterlaichling. The action has been adapted for the scenario with the forces almost completely equalised and facing one another across the valley of the narrow, tree-lined stream.
 |
| Deployment of the two armies for this game, French at right. |
 |
View from the southern end of the battlefield. That clear area nearest camera made excellent space for die rolls. John bemoaned all his lovely terrain that we did not use!
 | Map of the Battle of Eckmühl from Napoleon & Empire (black circle indicates the section of the battle in this scenario).
|
|
 |
| Photograph of the Große Laber, also from Napoleon & Empire showing it's tree-lined nature. The stream near Obersanding is similar. |
 |
| Map of the battlefield from the scenario in the rules. |
I had a plan!
When I had deployed my forces the night before, I knew little about the Austrian deployment (more on that under 'assessment of the rules' below) and developed a vague plan of my own. This became clearer to me in the 'cold, hard light of day' and I modified it a little to account for the actual deployment of my foe and the forces that I had available.
I still determined to attack Obersanding (for it's worth in the scenario) with Grandeau's large division of bog-standard line troops, expecting to 'swish' the paltry defenders away easily, thus drawing additional Austrian troops to that area before I launched my best division (Gilly's 15e léger and 33e ligne) to the right (south) of the town. This was an adaptation of my original plan which had been to send them to the centre. Meanwhile, my weakest division (Barbanegre's 48e ligne) and Pajol's cavalry would hold my right flank and keep the remaining Austrian forces at bay.  |
| Both sides opened up with a preparatory bombardment. |
 |
| The French fire was ineffective. |
 |
| Counter-battery fire from one of the Austrian batteries scored hits on artillery and massed ranks behind, |
 |
| ...while the second hit the second French battery. |
 |
| Step one: Grandeau's men to take Obersanding. |
 |
| In they go. |
 |
| Or perhaps not. Fours and above are hits. My successful dice in the middle, others at the bottom of the photo. John's at the top. |
 |
| Not this time fellas. |
 |
| Viewed from the Kaiserlick's perspective, one battalion of Riese's division was the garrison of Obersanding with another supporting it and landwehr further to the right (out of photo). |
 |
| The guns continued long range pop shots (not especially effective). |
 |
| I began phase two of the plan, sending Barbanegre's troops forward, Gilly's behind them. |
 |
| Phase one, take two. In goes a battalion of the 108e ligne (heavily disguised as légère). |
 |
| Nuh. |
 |
| Hang on. Having the division falter was not part of the plan! Time to enact one of the corps commander's 'super powers'. He, General de Division Friant, for which we used John's figure of Marshal Davout, used a C-in-C command: rode over to the division, they immediately obeyed their orders, recovered some hits and I added in an infantry assault. |
 |
| Wham! Obersanding taken by the first battalion of the 108e ligne,. Keep an eye on those fellas with the green fanion. |
 |
| The same from the Austrian perspective. |
 |
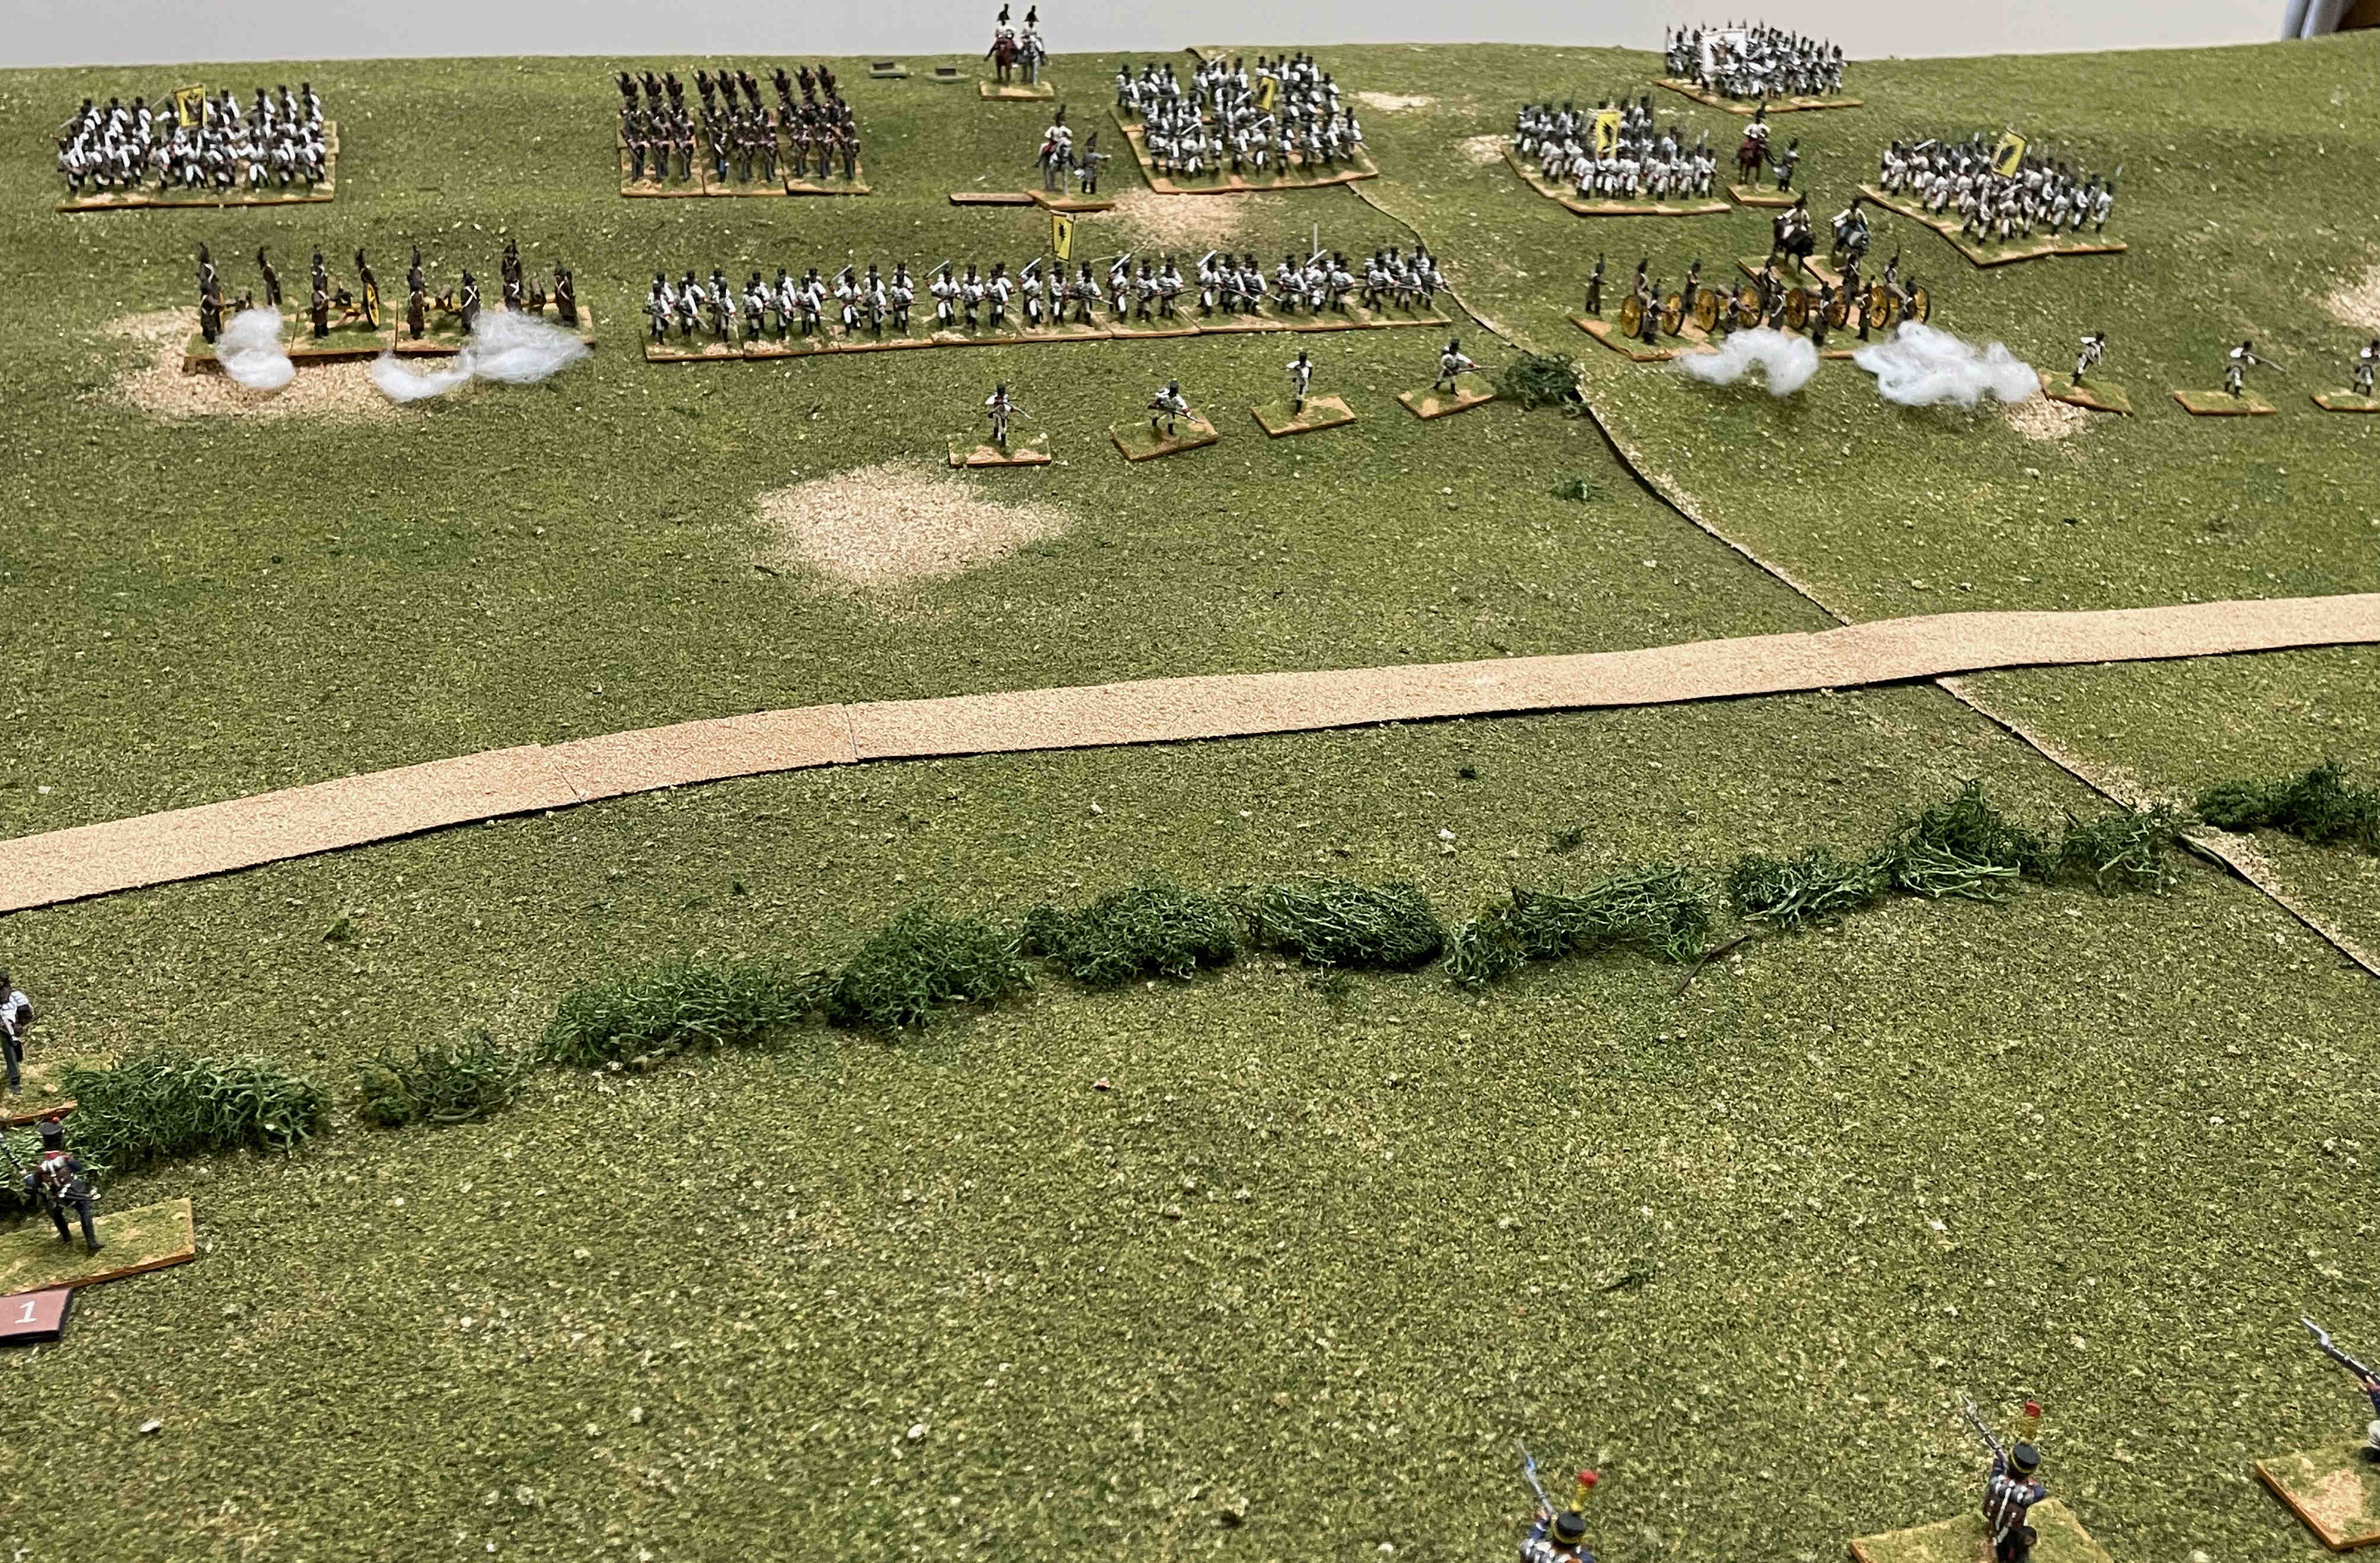
| Overview of the table at this point. All going to plan, with the exception of Pajol's cavalry. I decided that it was time for them to move, but they were not inclined to do so—I rolled poorly in the activation stage, they were hesitant and continued to watch proceedings from the ridge (top right of the photo). |
 |
| A closer look at the centre of the table. Keep an eye on those Austrian cavalry away to the top right of the photo. |
 |
| Here they come! Without my cavalry to dissuade them, John saw the opportunity and charged the hussars against Barbanegre's infantry. |
 |
| Back on the French left, no time to waste. I sent Gilly's 15e lèger to attack the Austrian line behind Obersanding. |
 |
| Phew! Panic over. My infantry formed square. That'll stop those pesky hussars in their tracks; huzzah! |
 |
| Huzzah all right. To break a square John needed to beat my score by seven or more. He rolled his little heart out, getting a 12. I managed a five. That's a difference of seven—in case you are arithmetically challenged! |
 |
| Zut alors! |
 |
| They took their breakthrough charge on to the next battalion. |
 |
| Back on the left, fortunately for me, the 15e léger closed & saw off the Austrian line (below). |
 |
| Perhaps my plan was still intact? |
 |
| The Stipsicz Hussars were not as successful this time. The 2/48e ligne got out of there before the hussars could close. Still, those Austrian cavalry looked very dangerous behind my infantry. |
 |
Ah, but it's not quite as the previous photo showed. Note the French battery unlimbered (centre right) and ready to cause some grief for those hussars (centre of the photo).
[Added to that, the hussars were unformed and could not charge again. They are toast! Perhaps not. In his next move—and having won the initiative—John took the option to withdraw them behind his infantry, denying my artillery their 'fun'.] |
 |
| The same viewed from the Austrian lines. |
 |
| And from the west. Finally Pajol's cavalry have moved! |
 |
| A cavalry mêlée ensued. The second sub-unit of the Stipsicz Hussars vs Pajol's 11e chasseurs. The chasseurs à cheval came off second best (note dice). I was reminded of a comment that Mark and Julian used to like to make: French chasseurs always lose. D@mn! |
 |
| Buoyed by their success, the Stipsicz Hussars charged again. The 12e chasseurs counter-charged. |
 |
| Austrians fighting with élan, while French unformed. Still, Austrians have more casualties. |
 |
| Victory to the French. Cop that Mark and Julian, haha! |
 |
| Back on the French left, the 1/108e ligne attacked the Austrian landwehr of Riese's command. |
 |
| While a battalion of Gilly's 33e ligne charged against the line of Grill's division. |
 |
| That green-fanion battalion win again! |
 |
| Not so the 33e ligne, who failed to close, letting off an ineffective volley. |
 |
| Viewed from the Austrian side. Look at that French infantry juggernaut! |
 |
| Cavalry of both sides prepared for another mêlée. |
 |
| It was time for the final attack. The coup de grace. I put my faith in the unbeaten green-fanioned battalion of the 108e ligne. Command rolls all successful. They'd attack with the benefits of 'glory' and 'infantry assault'. |
 |
| John helped me this time. His command roll for the Austrians failed and they were 'hesitant', so could not do much more than defend, but it does not affect their ability to do so. |
 |
| This time in the cavalry mêlée the 11e chasseurs closed with élan! |
 |
| Wot? The 1/108e failed and retreated! That cannot be! |
 |
| The chasseurs came second too?! |
 |
| One last chance to break the Austrian right. In went 1/15e léger against a battalion of Grill's division—with élan. |
 |
| They beat the Austrians, who retreated behind the lines of those beaten up units of Riese's division. Unlike that division, Grill's had taken some casualties, but was not too badly mauled, so no break achieved. |
 |
| At that point, after ten turns, I decided that my attack had run out of puff. |
Congratulations to John on his victory!
The successful charge of the Austrian hussars was the game breaker, I reckon. Barbanegre's division was supposed to guard my right flank. Without it, my right was exposed to continual fire from Grill's men whom John had moved forward, down the ridge.
The Austrian divisions were worn down; Riese's division was a poopteenth away from breaking and Grill's men had taken losses, but Neustadter's had not been engaged. In comparison, French losses taken attacking Obersanding and then against the Austrian right in general, meant that the units of Grandeau's and Gilly's divisions did not have enough left for another attack. Barbanegre's division could 'occupy ground' at best. The cavalry of both sides had fought itself to a stand-still.
Perhaps my 'tunnel-vision' attacking the Austrian right was mis-guided, but I think it would have been worse if I had diverted troops towards the Austrian centre or left. I would not have had enough to make the rolling attacks that I could with 2/3 of my infantry focussed on a relatively narrow point of attack.
Most importantly, the game was a successful play-test of the rules for John, who liked what he saw and experienced.
Thank you so much for the invitation to the game John. I had a marvellous couple of days and, as always, enjoyed catching up and super hospitality from you and Vanessa—that was a delicious meal that you cooked too!
I look forward to the next opportunity to have a game, to catch up, enjoy and discuss our shared passion and to have a few beers.
Appendices
1: Assessment of the rules
I did not have a copy, so had not read the rules before the game, which is not great. I had watched the videos of the test game between Richard from Too Fat Lardies and David Brown—actually, more listened than watched since I was painting at the time(1), but the moving pictures are not especially important for such a thing. I was worried by what I had heard as it seemed to me that they had become a fast-play game of dice.
(1. Still, I obviously took in more than I thought as I was able to relate things that I had heard in these videos when John and I were playing the game and checking/looking for a particular aspect of the rules)
Fortunately, I was wrong and the rules were better than I had expected.
They were not the fast-play game of dice that I feared. As with the original, there is more that I liked than did not. In fact, as we played the game I had a hard time working out what had changed from the original, aside from a few bits of extra 'fruit'.
I'll leave it to people who are more invested with the rules to produce a detailed comparison—no doubt someone already has—but the key differences for me are in the writing and presentation of the rules and in the way the approach to modifiers. The first is a positive for me, the latter I am less keen about.
The rules have been completely re-written and streamlined and the tables have been re-formatted. They have a table of contents and and index. There are all changes that increase the readability and ease-of-use of the rules. Interestingly, they still run to about 100 pages (but don't seem especially long and certainly not long-winded).
While there are tweaks and changes to nearly all of the rules, they remain in essence the same as the first edition. The big change is that where there were previously modifiers there are now re-rolls. This has the effect that one is rolling a lot of dice a lot of the time. Many wargamers enjoy this in a set of rules. I do not.
The combat system remains a good and sensible one. I like the fact that casualties accumulate and units wear down slowly. I prefer a combat system where there is a distinction between the charge or approach to mêlée and any actual close combat that may (or may not) occur. This is the case in General d'Armée (both editions), although I prefer the approach of the first edition.
Abstracting of command and control is still at the heart of the rules (perhaps even more so). I did not find that hesitant brigades** were as much of a pain as in the past as I had a plan and built my attack rather than trying to move everything—plus, my early dice rolls for command were good. Nevertheless, I’d rather another mechanic than the abstracted aide-de-camp one used in these rules, but it is at the heart of the rules’ mechanics. Some of the taskings, and especially the new C-in-C commands, seem particularly like ‘magic’. Although, I can relate them to occurrences in historical battles; such as a commander, aide or other officer going around and forming stragglers into ad-hoc units (which is sorta like the removal of losses from units that is a benefit of some of the C-in-C commands). Trouble is, the C-in-C commands do not necessarily relate to such an event occurring on the table at the time and there is no practical reason for an army to have only one, or more than one of these, apart from as a pure game mechanic.
**There is an explanation/justification for hesitant brigades that it is like historical instances where an advance slowed because a brigade’s formations or relative positioning got out of whack. That would be fine if the likelihood of a brigade becoming hesitant was related to things such as that actually occurring on the table and in the game, rather than simply a bad die roll against a brigade that is in good order, may not have even moved or been under fire.
The rules have hidden deployment at the start of the game. The defender places a die to indicate the deployment area for a brigade, including a number of allowed dummies. The attacker may attempt to scout a given number of the defender's hidden forces (generally three) before placing his formations on the table. The defender then places the formations for any remaining formations that were not successfully scouted (and removes the dummies). Such a mechanic is used in Le Feu Sacré and Blucher, plus no doubt many other sets that I am not aware of. I first saw it in Principles of War that a few blokes were using at the wargaming club in Perth in the 90s. It's not a mechanic that grabs me and, since I am mainly interested in games of historical battles, I'd simply leave it out.
All that said the rules are not terrible in my opinion and I’ll gladly be involved in a game with them again—especially since John likes them so much! :)
2: Rules & Figures
General d'Armée second edition.
All figures 1/72 scale from John's collection and painted by him.
French infantry Esci, Hät and Zvezda, chasseurs à cheval Italeri and artillery Zvezda.
Austrian infantry Hät, hussars Italeri on Hät horses and artillery Hät.


We are four nights onto our first game of General d'Armee 2 and I am enjoying it, so it was niuce to read your thoughts as well James. I quite like the deployment mechanic for an encounter game, but would prefer to see some form of figure removal so at least you can see the units start to become whittled down rather than just suddenly dispersing, and find it a bit different not having to do a test to get a charge away, although I suppose that is covered more by the charge result.
ReplyDeleteHi James, great post mate. Your camera takes a very clear photo. I must touch up those French bayonets. Apparently Austrian blood makes a good substitute for paint stripper.
ReplyDeleteI should mention that, for at least a couple of initiative rolls, we'd missed adding one die to my initiative roll after you captured the village. This might have had me winning initiative for a turn or two that I perhaps shouldn't have.
Another rule I picked out after the fact was that artillery pivoting or prolong fires with 1 CD, and I did have to pivot that battery nearest the village once as your columns arrogantly passed it by. And so one of those units just might have had enough oomph left to cause the Austrians to falter and maybe even carry the day! I've never seen such disrespect for cannister fire.
Thanks for making the long drive yet again James, you are a true enthusiast.
Looks like a fantastic game James and we'll worth the 700km round trip!
ReplyDeleteThe rules seemed to work pretty well and the narrative indicates realistic outcomes, although light cavalry breaking a square isn't something you see often....but, it should be possible, even if only remotely...a 12 to 5 roll isn't common!
very pretty table and miniatures, looking really good in ranks and formations. Sounds like fun to drive over, stay the night, and then play a large game. 😁
ReplyDeleteGreat looking game and interesting to hear your thoughts on the rules.
ReplyDeleteThat's a large game and better than to be on the reenactment which was canceled last weekend during the heavy rain (I fortunately was dancing elsewhere).
ReplyDeleteInteresting read. I didn't get very far with my play test of GdA1; way too many tests of various kinds for me. Also not a fan of dice re-rolling as a mechanic, especially as a matter of routine. Some guys can take forever rolling dice!
ReplyDelete