Following on from my previous post, Mitch has sent me some notes about his painting method as well as some photos of figures in progress and some beautiful completed ones.
Over to you Mitch.
(captions to his photos by me)
As there has been a bit of interest, I thought I might give a description of the method I use, along with some pics.
First I clean up the figures with a pointy hobby blade.
Getting rid of mold lines is more important with this method of painting. Although they can be semi hidden later.
Next paint the whole figure black. Matt/satin is best as gloss is harder to dry brush on, I think.
When give the figure a heavy dry brush in dark-ish grey.
The best, & cheapest brush for this is a make-up brush.
They were quite cheap at K-mart in a pack.
Otherwise, a big brush of size 6+ is good & quick.
As you no-doubt know old bushes are probably better for this.
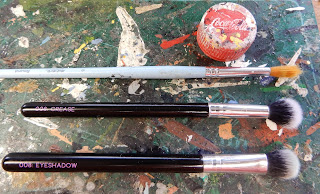 |
| Some tools of the trade. Brushes for dry brushing and coke bottle cap for holding the figure. |
The trick is to get the right amount of paint on the brush.
I use a piece of paper to wipe the excess off the brush & you can quickly 'refuel' the brush by soaking up the smear on the blotting sheet.
With the fine bushy hairs you can dry brush at high speed, sweeping over the entire figure.
I normally sweep around the figure 2 or 3 times, until I am happy I have highlighted all the detail, but not filled in too much of the black.
Give the figure an hour or so to dry, but overnight is better.
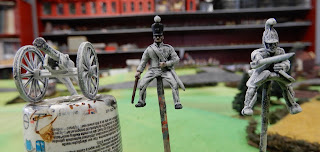 |
| Figures after dry brushing with the one in the centre still showing its black undercoat. |
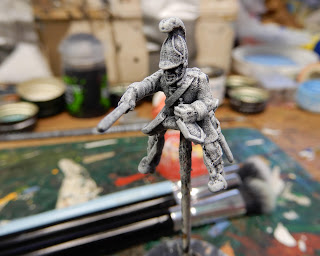 |
| A closer look at the Prussian cuirassier figure. |
Next, I repeat the dry brushing process with white.
This is a lighter coat, not getting into the deeper recesses but picking up all the highlights & flat surfaces.
Once again, I sweep over at least twice.
There is a line between too much & not enough & you never know until you cross it. :)
After this you should have a sort of greyscale paintjob on the figure.
You can stop the prep process right now, but If you are fussy (like me). You will come back with a fine white brush & camouflage any little black mold lines or other bits that on one else will notice.
I use cheap hobby acrylics for all this prep.
There are some quite nice ones in tubes, made for artists, & there even cheaper options.
Originally, I experimented with various things to colour-in the figures but quickly discovered pigmented inks. These gave much stronger colours than normal inks, removing the need to apply, especially lighter colours, more than once.
I became quite adept of mixing up the basic 8 or so colours to get the military shades I wanted. I have quite a collection of swatches, yellow is by far the most used colour in the mixes, it seems.
But nowadays we have Contrast paints (by GDW) & Speed paints (Army painter).
I am using these for most colours now.
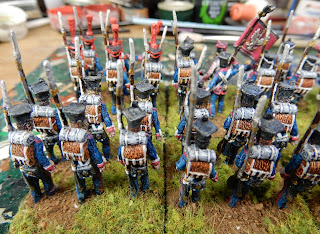
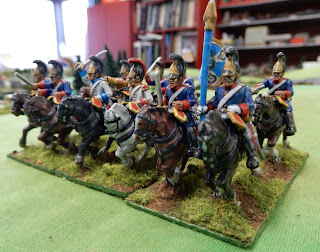 |
| Completed Prussian cuirassiers. These are 1/72 scale, 3D-printed figures. |
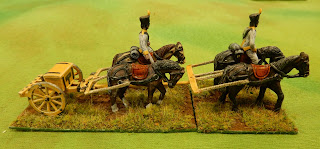 |
| This time a 1/72 scale Austrian limber by Hat. |
It is easy & quick to paint with inks, speed paints also live up to their name.
Not having to keep within the lines so accurately, already having things like backpack straps already picked out & painted plus other things James has mentioned all help.
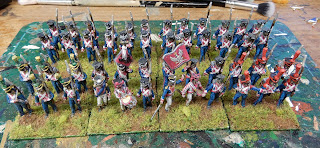 |
| The piéce de résistance: Polish line infantry. The 6th, I do believe. |
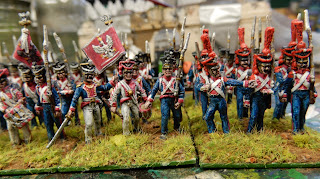 |
| Chiefly Strelets figures, apart from the central officer and drummer who are from Italeri. |
 |
| I was astounded that Mitch had painted the white outline on the backpacks (which are amongst the excellent detail in these Strelets figures). He explained that it was all a bit of a 'cheat' as he had simply filled in the back pack of the dry-brushed figure (with a little bit of touch-up of the white, I presume). |
Thanks for these notes and lovely photos Mitch. I found it useful and I'm sure that others will too. Or just enjoy the pixies!!


Great tips from Mitch. Hopefully it will help me get through my lead pile quicker.
ReplyDeleteThanks James ( and Mitch!), that's very interesting! I like the idea of achieving highlights/shading by in effect using the undercoat, rather than trying to paint multiple layers of variations of the base colour, which just seems way too much work!
ReplyDeleteThe effect is very nice indeed and Mitch's figures look great. I'm a big fan of the black undercoat myself.
ReplyDeleteWell, I don't know Mitch, but he seems like a nice man; but I do know that he's a Naps player and since we all know that Naps players are the most picky gamers in the world about painting then we can conclude that if he is pleased with the result then it must be a good method. 😁
ReplyDeleteYes, these look really, really good, so as Stew implies, the proof of the pudding is in the painting! It will be interesting to see you give this technique a go, James!
ReplyDeleteMitch certainly got a great effect painting thus way.
ReplyDeleteNice post, I've done similar on some Perry Austrians, always good to see how others do their painting, my approach to Napoleonics has changed to being sloppier and faster, to get the basics done and then tweak further down the line, these do look great, especially for 20mm!
ReplyDeleteBest Iain caveadsum1471
Thanks for all the kind comments.
ReplyDeleteI have been painting this way for many years.
The Poles were a bit of a pain to paint, with all the white edging & such. Give me some Prussians to paint any day, they would take less than half as long.
It works very well with WW2 infantry, as there is no where near as many colours required for their uniforms.
I have painted up a scale battalion (over 100 figures) of Africa Corps in a weekend!
But it works well with all sorts & saves a lot of time to achieve the base, shadow & highlight effect.
There seems to be many people painting in a similar way with contrast paints.
They often use 'zenithal shading'. This technique involves painting the figure black then applying spray paint, from above, to create the effect of light shining down from above & providing shadows.
I tried it, but not being a spray paint expert, found it easier to use the dry brushing.
There are many you tube videos to show this method.
Cheers
Mitch...